Capture multiple traces
What will this section cover?
- Setting up our ChipWhisperer scope and target
- Running AES on our ChipWhisperer target
- Performing a power trace of our algorithm
- Saving multiple power traces to a file
Cracking the key used by AES with Power Analysis is a lot more complex than was the case with RSA. Looking at one trace of an RSA decryption can potentially give you all the information you need to crack the private key. With AES and, more generally, with Correlation Power Analysis, it is necessary to perform multiple traces and average those power traces out. In this section, we are going to have a look at how we can set up a ChipWhisperer to measure power traces. Afterwards, we are going to do some traces and learn how to save them, so we can later do more detailed analysis on them.
Note: If you just want to move on with the analysis or don't have a ChipWhisperer board at hand, you can download a pre-made power trace over here.
Setting up our ChipWhisperer board
Assuming that you have correctly set up your software environment, we can start connecting and setting up our ChipWhisperer board. This is going to go in 2 steps:
- Fetching and setting up our scope
- Setting up and programming our target
Basics
Before we actually start scripting, we are starting in the Python Interpreter. We can get into the Python Interpreter from our shell using the following command:
python3
In order to then get started with the ChipWhisperer Python Library, we can import the library with:
import chipwhisperer as cw
If one gets an error here, verify that the ChipWhisperer Python library is properly installed. Otherwise, we can try to connect our ChipWhisperer Capture board to our computer via USB and run the following command to connect to the Capture board.
scope = cw.scope()
This should connect to our capture board. On some ChipWhisperer capture boards an extra light might start flickering. If you get an error, there most probably is something wrong with your connection. If you are on Linux, perhaps you have to set up some udev rules.
Now we are going to set some settings used by the ChipWhisperer board(s). For now, we will just use the default settings. That works well enough for now, but if you want an overview of the possible settings, look over here. We can select the default settings using the following command.
scope.default_setup()
Then we have to fetch the target board. This is going to contain all the connections and settings about the microprocessor which is going to execute our algorithm. If you have hooked up your target — this is done automatically for the ChipWhisperer Lite boards — you can use the following command to fetch the target object.
target = cw.target(scope)
Now in order to safely disconnect our target and capture board, and we can use the following two commands.
scope.disconnect()
target.disconnect()
Now we know the basics of how to set up and interact with the connection between our computer and the ChipWhisperer board.
Scripting
We know some basic commands, so we can actually start scripting. We create a Python file, and put the basic commands — we just learned — into it.
This is what it will look like.
import chipwhisperer as cw

# Setup a connection with the CW board
# and fetch the scope for using this board.
scope = cw.scope()

# The default settings are fine for now.
scope.default_setup()

# Fetch the target from the scope
# This should be automatically connected
target = cw.target(scope)

#
# We do our logic here!
#

scope.dis()
target.dis()
Running this script using the python3 file-name.py command should work just
fine and now we can start actually working with an encryption algorithm.
Uploading the algorithm source code
Depending on what target we are using, we need to upload different software. We can compile this software ourselves, but a lot of compiled code can also be found online. The compiled code for AES can be found here.
Note: This walkthrough will demonstrate the process of uploading source code for the ChipWhisperer Lite ARM board, although many of the concepts here can also be applied to other boards. More information on other uploading source code for other targets can be found here.
In order to upload a binary to the CW Lite ARM, we will use the Intel Hex
format. Therefore, assuming we are
using the ChipWhisperer Lite 32-bit ARM-edition, we can the CWLITEARM hex
file provided in the SimpleSerial AES GitHub folder.
Assuming we have downloaded that .hex file and put it into a folder called
hexfiles we can use the following Python code to upload the program to our
target.
# ... Connecting to the scope / target

from chipwhisperer.capture.api.programmers import STM32FProgrammer
import os

# Initiate a new STM32F Program
# STM32 being the ARM microcontroller that we are using
# https://en.wikipedia.org/wiki/STM32#STM32_F3
program = STM32FProgrammer

# Get the path to the current folder
# Adjust accordingly
aes_firmware_dir = os.path.dirname(os.path.realpath(__file__))
aes_hex_path = os.path.join(aes_firmware_dir, r"hexfiles/simpleserial-aes-CWLITEARM.hex")

# Apply the program to the actual target
# This allows us to run the hex code on the microcontroller
cw.program_target(scope, program, aes_hex_path)

# ... Disconnecting from the scope / target
Now that we have uploaded our program to the ChipWhisperer target board, we start capturing traces.
Capturing a trace
In order to run our first trace, we need a key and some plain text. The program we are using is based on 128-bit AES, and, therefore, we should provide a 128-bit key and a multiple or 128 bits for our plain text. We can quite easily create our first trace, with the following code.
# Define the key used for the encryption
# This key has to be 128 bits = 16 bytes
# = 16 ascii characters in length
key_str = 'H4ck3rm4n-l33t42'

# Convert the key to a byte array
key = bytearray(key_str, 'ascii')

# Define the plain text used
# This plain text has to be a multiple of
# 128 bits = 16 bytes = 16 ascii characters in length.
plain_text = bytearray('a' * 16, 'ascii')

# Capture the actual trace
trace = cw.capture_trace(scope, target, plain_text, key)
NOTE: Within the SimpleSerial protocol — which is used under the hood by the ChipWhisperer devices — the
capture_tracefunction corresponds with a couple of steps (arming the ChipWhisperer, sending the key/plaintext and retrieving the trace data, etc.). This can become important when implementing your own algorithms. There it may be important to replace this one function with its individual steps to get more control over the commands send. This can be seen in the Python code of the SimpleSerial C template.
This is very interesting, but we don't really have any confirmation or visualization. So let us visualize it with matplotlib.
import matplotlib.pyplot as plt

plt.plot(trace.wave)
plt.show()
This should look something like Figure 1.
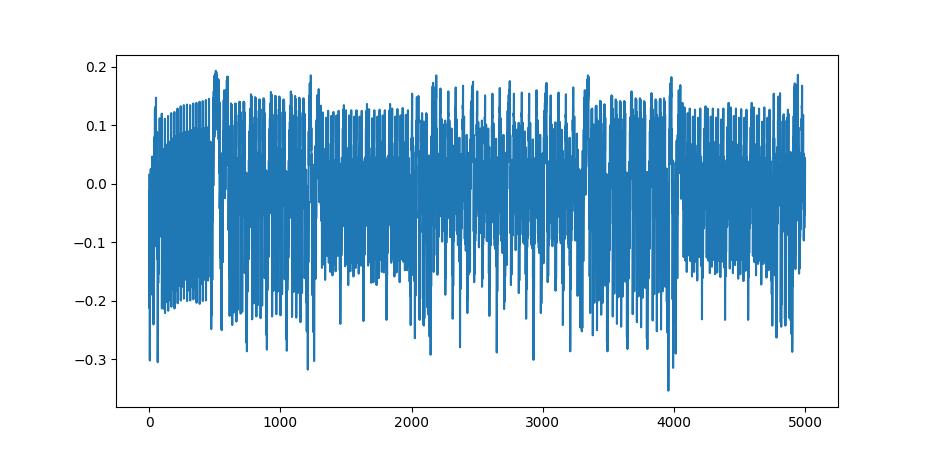
Figure 1: AES Single Power Trace
Capturing more than one trace
We can turn this into multiple traces with a simple for loop. Here we are
going to be using the TQDM library to have a nice progress bar. So let us
create 100 traces with random input text and save all relevant data into a
numpy arrays. This way we can save the eventual traces and plain texts to a
file.
First we define a function for creating random plain text strings.
import string
import random

def random_string(length):
    # Define the alphabet of the random string
    # Here we take the lowercase latin alphabet in ascii encoding
    # e.g. "cpjsapcnrsdtjvlo", "btqfocsprbualtwt" or "yzkwewjbkpmriccx"
    alphabet = string.ascii_lowercase

    # Return a string with the given length with randomly chosen chars
    return ''.join(random.choice(alphabet) for i in range(length))
Then we capture some traces.
from tqdm import trange

# Define the key used for the encryption
# This key has to be 128 bits = 16 bytes
# = 16 ascii characters in length
key_str = 'H4ck3rm4n-l33t42'

# Convert the key to a byte array
key = bytearray(key_str, 'ascii')

# Define the constant for the amount of traces
N = 100

textins = []
traces = []

# Loop through all traces
for i in trange(N, desc="Capturing traces"):

    # Define the plain text used
    # This plain text has to be a multiple of
    # 128 bits = 16 bytes = 16 ascii characters in length.
    plain_text = bytearray(random_string(16), 'ascii')

    # Capture the actual trace
    trace = cw.capture_trace(scope, target, plain_text, key)

    # If the capture timed out move to the next capture
    if trace is None:
        continue

    textins.append(plain_text)
    traces.append(trace.wave)
Then we turn this into numpy arrays.
np_traces = np.asarray(traces)
np_textins = np.asarray(textins)
Then we can save it to a file.
np.save('output/traces.npy', np_traces)
np.save('output/textins.npy', np_textins)
This way we can later load it.
For more information on how to do scripting with the ChipWhisperer python module have a look over here. Disclaimer: This is quite heavy.
We have now correctly set up our ChipWhisperer equipment, uploaded the source code of the encryption algorithm we are using to the target, captured power traces of the target and saved those power traces to a file on our system. Now, we are ready to do some analysis on those power traces.